Wednesday, December 6, 2017

John Deere 7500 Ball Joint Conversion Kit

John Deere 7500 Fairway Mower

I had a John Deere 7500 fairway mower that needed the rear inner ball joint replaced. I looked up the factory part and discovered it was over $300 dollars for just one inner tie rod. I have seven of these mowers and three of the 8800's which take the same ball joints. It was time to make a conversion kit.


The steering cylinder has internal threads (M16 x 1.50). The ball joint has external threads (M18 x 1.5). I looked for hours to find a direct replacement with no luck. As you may know, John Deere does a great job at making parts proprietary. As a result, I contacted Moog Suspension Parts. The gentleman I spoke with sent me a PDF of inner tie rod ends and outer tie rod ends. It listed all the specifications for each ball joint part number. From the PDF, I was able to find something that was close. The issue with the closest outer tie rod I could find, was that the taper that goes through the spindle was, in fact, too small.

That started another search for an adapter to fit the spindle hole. The top of the hole in the spindle has an I.D. of .875". The closest outer ball joint I could find had an OD. of .708" at it's largest point.  After some more research, I found an adapter from Teraflex (part # 990113). I contacted a representative from Teraflex to get the dimensions of the adapter. The adapter has a straight OD of .875" and inside it has a 1.5 inch/foot taper. The top of the taper is .663" and it is .556" at the bottom.

I had to remove the taper from the spindle. I started with a 13/16" drill bit, followed by a 7/8" bit. After the hole was drilled, I installed the adapter.


I ordered the inner ball joint (part # EV415) and outer ball joint (part # ES3466) from O'Reilly Auto Parts.  The inner ball joint has external threads (M16 x 1.5) on the cylinder end and (M14 x 1.5) on the other side. It's length measures 6.29 inches. The outer ball joint has internal threads (M14 x 1.5) and measures 3.70 inches.  I had to cut off a 1/4 inch on the inner ball joint (part # EV415) and a 1/2 inch on the outer ball joint (part # ES3466) to make room for adjustment. I replaced the inner and outer ball joints on both sides.


This project took a lot of research but, in the end, was well worth it. The total cost of the repairs to replace the ball joints on both sides was under $100 dollars. If I had replaced all the same parts from John Deere it would have been over $1200 dollars. 

Masterpro EV415 - $12.06
Masterpro ES3466 - $22.12
Teraflex 990113 - $11.39

If you have any questions feel free to shoot me an email tmanning@ansleygc.org


Monday, May 18, 2015

Sod Cutter Jr. 16" blade

In Georgia we get a lot of 16" sod. We have a Sod Cutter Jr. with a 18" blade. Ryan offers a 16" blade (p/n:4132716.7) for their heavy duty model. To make the blade fit the wheels have to be shortened and add a spacer to the blade mount.

I started by cutting off 1" of the outside of each wheel. I used a 10" horizontal band saw to make the cut.


After the wheels were cut, we decide to make them so they could be reattached for use with the 18" blade. I sprayed blue layout fluid on the wheel to aid in seeing my scribe marks. I center punched each scribe mark to help center the drill bit. I drilled (6) 3'8" holes 60 degrees apart in the middle of the cast iron. When drilling I always start with a small bit and work my way up to the final diameter.


I lined up the 1" section of the wheel to the large section. Then I used a 3/8" transfer punch to mark the holes in the large section.


I drilled 3 holes 120 degrees apart with a 3/8" bit and the other 3 holes with a 5/16". The 5/16" holes were tapped with a 3/8"-16 tap. In the picture below I installed setscrews in the tapped holes and plastic rivets in the 3/8" holes to keep dirt out.


I used a piloted counter bore to recess the holes for the socket head cap screws.


I center punched the 3/8" stainless rod so it would stay in the 1" section of the wheel. I also used red loctite on the rods to prevent them from coming out.


I made (2) 1/2" spaces to go on both sides of the blade. I used a piece of 1/2" X 2" flat bar cut 1-1/2" long. I used a 5/16" transfer punch to mark the holes using the blade as a guide.


I also added 2 extra wheels to the rear to aid in stability. I used 1/2" round bar for the axle and washers to space the wheels a part. I cut the axle to length and drilled a 1/8" hole in each end. I installed cotter keys to keep the wheels in place.


Here's the finished product.


If you have any questions shoot me an email.


Wednesday, May 13, 2015

Fertilizer Mix Tank

After we decided to go to a foliar fertility program, I was tasked with designing and building a fertilizer mix tank. First, I turned to Google, this was not much help. I found a few post showing mix tank setups but that was it. I couldn't find any specs on pumps, piping size, flow rates or design diagrams. This was going to be fun.

I talked to a tech at Dultmeier Sales, they cater to the agriculture industry, he gave me a good starting point. We decide on a 500 gallon cone bottom tank with a 2" 3HP centrifugal pump that would pump 150GPM. I drew a schematic of the plumbing of the tank and pump on graph paper. From the schematic I made a parts list of all the fittings and hoses I would need.

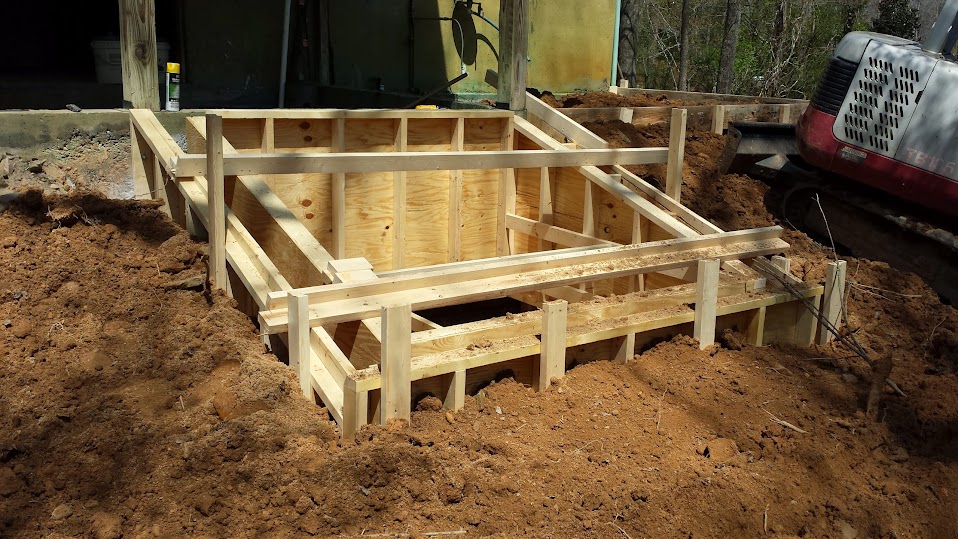
Before I could build and install a mix tank we had to build a containment area for the 500 gallon tank. We made a monolithic form so we could pour the floor and the walls of the containment at the same time.


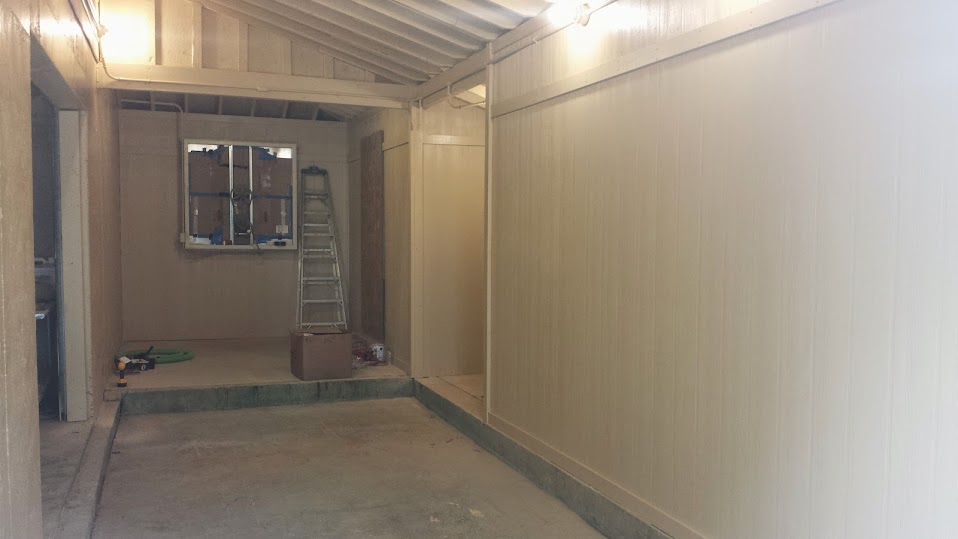
We extend the roof of our existing chemical building to cover the new containment area. We also closed everything in to have a dry mixing area.
I installed an exhaust fan to get rid of any fumes while loading the sprayers.
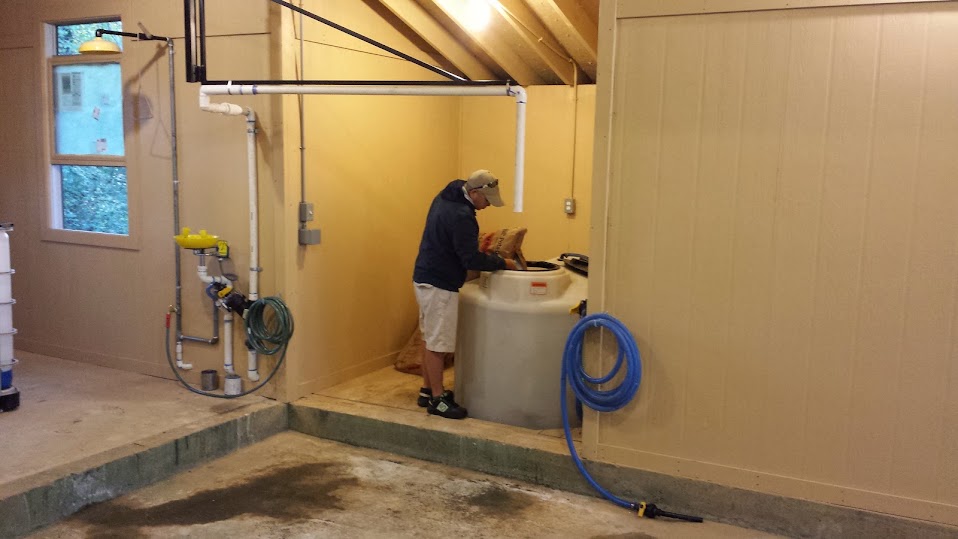
I built a platform around the 500gal tank for safety concerns and to make it easier to pour in fertilizer.
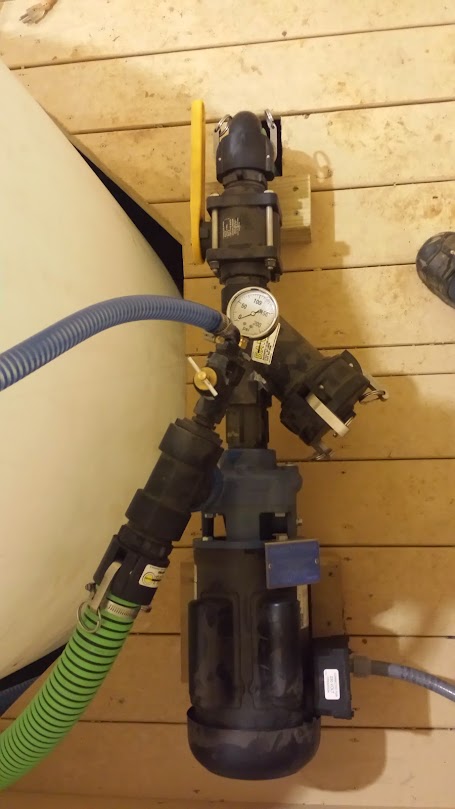
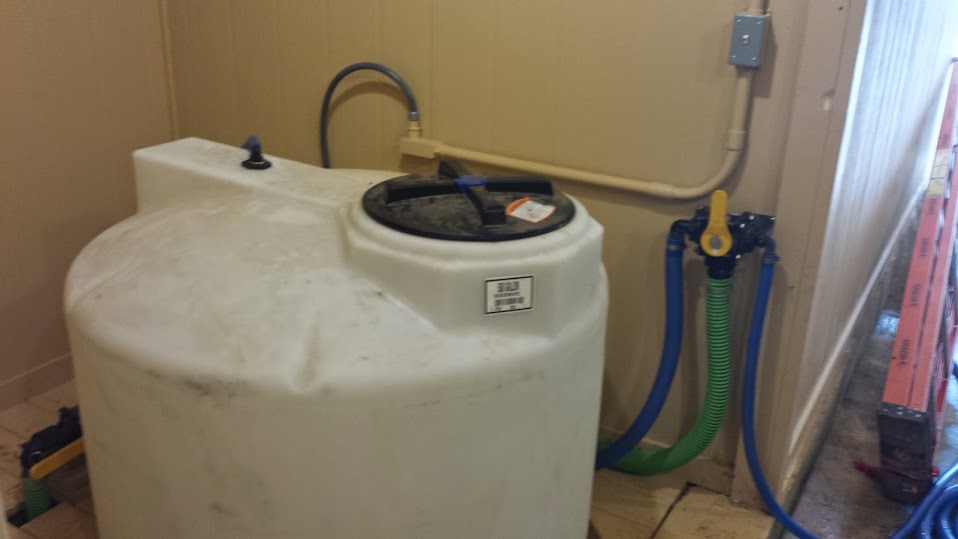
The pump is mounted behind the tank. I have a 100 mesh strainer installed to protect the pump. I also install a pressure relief valve with pressure gauge for pump protection. The suction hose connects to the ball valve with the yellow handle. The pump discharge is teed, with the green hose for mixing or filling and the blue hose for recirculation.


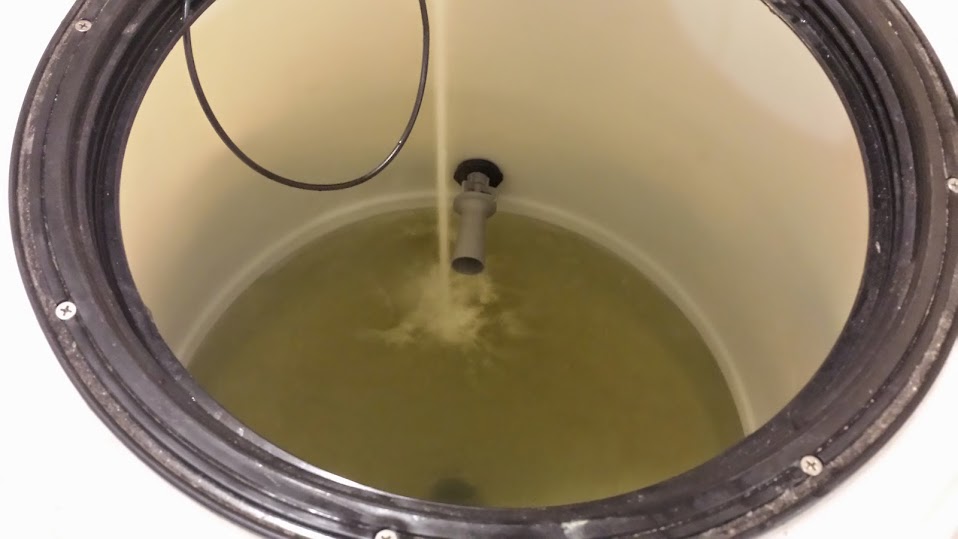
The eductor increases agitation 5 to 1.


The green discharge hose connects to a 3 way ball valve where flow can be directed to the tank for mixing or to fill the sprayer. The electrical switch turns the pump on and off.
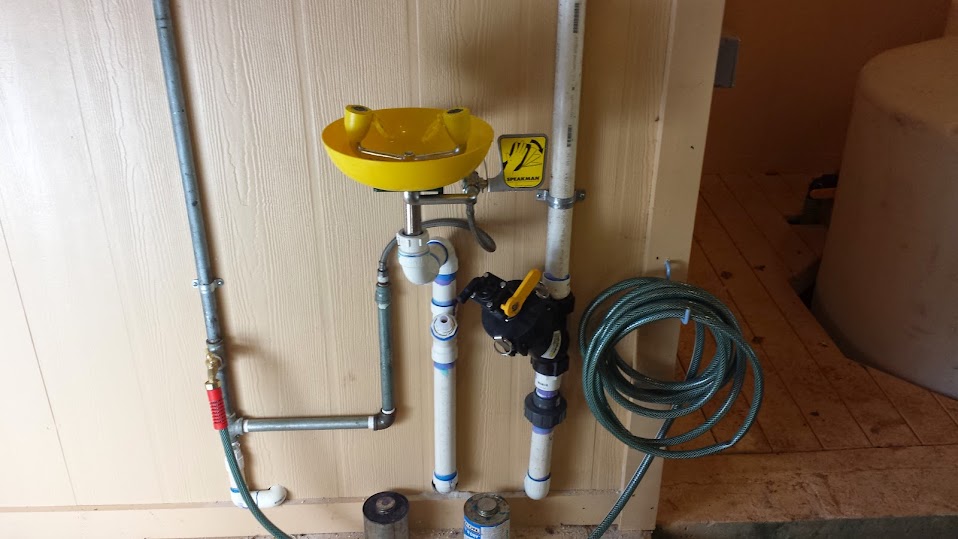
The shower, eyewash and garden hose are connect to a fresh water line. The pipe with the 100 mesh strainer is a irrigation line for filling the mix tank and sprayers.
The overhead fill is connected to a 1.5" electric valve that is controlled by a switch on the wall. The box below the switch has a 24 volt transformer to operate the the valve. The valve is a standard irrigation valve. We can fill our 300 gal sprayer in 4 minutes with the irrigation line. We can fill the sprayer with liquid fertilizer in 8 minutes from the mix tank.

This was a fun project! If you have any question concerning the mix tank shoot me an email.


Wednesday, November 12, 2014

John Deere 2653 Belt

I've only changed 2 belts on a John Deere 2653 before but that was enough for me to realize I didn't want to do any more of them.  Anyone that has changed one before knows how big of a mess and time consuming it is.  I've done the trick of putting on two belts and zip tie one to the fan shroud so when one breaks the second is there and ready to go.  My complaint is any repair in the category of "Maintenance on a wearable item" should be as simple and quick as possible.  However this one isn't.
With my woodworking hobby I have come across several link belts and always wondered if it would work in this situation.  I put one on a 2653 in summer of 2012 and it is still going strong.  The belt cost is 33.99 and goes on in 20 minutes instead of 4 hours.  The nature of link belts are they run quieter and cooler so there is less stretching.  If you have a belt that is troublesome to get to, try this belt.  It may be the missing link to an easy repair.

I updated this post and included a pic of the link belt part number and some description.  The OEM belt has an effective length of 34 inches and 1/2 wide.  You'll need the 1/2" wide link belt in the 4' section.  Pay attention to the arrows printed on the link belt.  It will tell you the direction the belt needs to travel for proper operation.  When you're done with the install you'll just have a short section of belt left over.


Monday, August 18, 2014

Granite Surface Plate and Stand

I've wanted a good surface plate for quite some time but was making a metal parallel plate work as long as I could.  I finally found a plate and stand combo priced really well.  I got it from MSC Direct as a combo set for 360.  The surface plate is "Grade B" or tool room which is more than accurate enough to do what I'm doing with it.  As you can see I made some modifications on the stand.  I wanted it to be level with my lift gate on the back of the grinder.   I will add a plywood bottom for storage and to prevent the top of the surface plate from being a place to lay tools.

  I put 1000 lb swivel casters on it for easy moving.  The caster plates were so big I had to weld a brace in to accommodate the bolt holes. Two of the casters are lockable. 


 When I get a reel ground, I can roll it off the lift gate right onto the surface plate and perform the checks.  I also added some arms to each side.  One set allows the reel to roll over the drop lip of the lift gate onto the surface plate.  The other allows me to roll the reel off the surface plate and check/set the reel without flipping it upside down.


I finally added the bottom.  I used a router and mounted a square piece of steel into the plywood so my magnetic indicator would have a place to stick.


Thursday, May 1, 2014

Toro 7 Gang Hydraulic Valve Upgrade

The course purchased this Toro Gang mower new in 1988. Originally it was used for fairway during grow in. For the last 20 years it has been our primary rough mower. We mow rough at least two times a week from April through September. It is responsible for cutting a lot of turf.

In the spring of 2013 our director of agronomy asked me if I could install an electric over hydraulic valve for raising and lowering the cutting units. Raising and lowering the cutting units has always been a cumbersome task. One has to actuate the valve on the tractor with one hand and reach behind the tractor with the other hand to actuate the valve for the cutting unit. Below is some pictures of the original valve. There are 5 spools in this valve. The center one operates number 1,2 and 3 cutting units. The one left of center operates number 5 cutting unit. Left of that is number 7. Right of center is number 4, then number 6.


 I started the search for the valve on the internet. I found the Cross Company out of Greensboro, NC. They are a distributor for Walvoil valves. After talking to Walvoil we decide the valve we needed was model 18ES3(X5)/RC-SAE-12vdc. The valve came complete with solenoids. There is a solenoid on each side of the spool to make it bidirectional. I also ordered the Canfield connectors part # 5F6C4-000-HUOA from Cross Company. They are 12 feet long and connect to the solenoids.


Next I needed to make a control box. I turned to Mouser Electronics out of Mansfield, TX. They have everything electronic. With my Toro back ground I wanted to use Carling Switches. The switch I needed was a double pole double throw switch. It is momentary on, off, momentary on. I purchased all the electrical components from Mouser. If you would like a parts list please email me.

Then I started the wiring process. The 2 white wires on the right side of the box are the main power. These wires went to the center tabs of the first switch. I used a short jumper to power the other switches. For all the wires coming in the box I used Heyco liquid tight cordgrips. Each spool on the valve has 2 solenoids, one for raising and one for lowering. The wires that come into the box in the bottom cordgrips are for the lower solenoids. The wires in the upper cordgrips go to the raise solenoids.

 Here's control box after it was finished

Here's the wires connected to the lower solenoids.


Now it was time to install the valve. I mounted the valve in it's originally location. I had to fabricate a plate for the valve to rest on. It is slightly larger than the original plate. The original valve had -8 SAE ports. The new valve has -6 SAE ports. I ordered the adapters from Grainger.
Here's the valve installed!!! 


If you have any questions please email me. Trent Manning